Translate

顯示具有 綜合效果器 標籤的文章。 顯示所有文章

2023年6月23日 星期五

Modeler vs Profiler ?! |NUX AMP ACADEMY vs IK TONE X vs Kemper Profiler Player

Modeler vs Profiler ?! 

NUX AMP ACADEMY vs IK TONE X


Stomp-box Modeler


之前我們在2022年3月份,寫過一篇橫向對比的Stomp-box Modeler,介紹了市面上常見的產品,如NUX Amp Academy、Strymon Iridium、Walrus ACS1、Atomic Ampli-Firebox、BOSS IR-200等等。

Previously, in March 2022, we wrote an article on the Stomp-box Modeler comparison, introducing common products on the market, such as NUX Amp Academy, Strymon Iridium, Walrus ACS1, Atomic Ampli-Firebox, BOSS IR-200, etc.


而主打Plug-In軟體的IK Multimedia也在AmpliTube的基礎上,推出Stomp-box Modeler: TONE X。 TONE X採用的算法是類似QC的AI建模,源自跟KEMPER系出同門的『黑盒算法』。

IK Multimedia, which mainly focuses on Plug-In software, also launched the Stomp-box Modeler: TONE X on the basis of AmpliTube. The algorithm adopted by TONE X is an AI modeling similar to QC, which is derived from the "Black Box Algorithm" of the same family as KEMPER.

註:關於Amp Modeling的技術與IR的觀念介紹,請見:

Note: For the introduction of Amp Modeling technology and IR concepts, please see:


IK TONE X vs NUX Amp Academy

理解大家沒有耐心看一堆文字敘述,所以我們直接上主菜,音色對比。
這邊我們挑選幾個有共同音箱模型的Reference來做對比。(搭載一樣的IR檔。)

I understand that everyone has no patience to read a bunch of text descriptions, so we go straight to the main course and compare the sound.
Here we select a few references with the same Amp Models for comparison. (Equipped with the same IRs.)

1. IK ToneX vs NUX Amp Academy | JCM800 

2. IK ToneX vs NUX Amp Academy | Super Reverb

3. IK ToneX vs NUX Amp Academy | Twin Reverb


Amp Modeling & IR

在說明Modeler與Profiler之前,我們先來講述一下Amp Modeling跟IR之間的區別,我發現有許多人對於這兩者之間的定義有所混淆。

我們在中文說到的『音箱模擬』指的就是『Amp Modeling』,也就是針對『音箱』來做建模的動作。後面我們會講述到Modeling的方法。

Before explaining Modeler and Profiler, let's talk about the difference between Amp Modeling and IR. I found that many people are confused about the definition of the two.

The "Amp Simulation" we mentioned in Mandarin refers to "Amp Modeling", which is the action of modeling for an "Amplifier". We will talk about the Modeling method later.

(由上圖可知IR所還原的就是『麥克風收取箱體(喇叭)』的聲音。 
From the picture above, it can be seen that what IR restores are the sound of "Micing the Cabinet (speaker)".)


而IR其實是近幾年用來實現Cab Sim的一種方法,在之前的文章有提到過,近年因為DSP運算力上來了,所以早期採用濾波器做Cab Sim的方法就改由IR卷積取代了。 所以IR指的是『箱體模擬』,並非『音箱模擬』。

IR is actually a method used to realize Cab Sim in recent years. As mentioned in the previous article, in recent years, due to the increase in DSP computing power, the early method of using filters to do Cab Sim has been replaced by IR convolution. So IR refers to "Cabinet Simulation", not "Amp Simulation".


Amp Modeling: Modeler & Profiler

音箱模擬,顧名思義就是要去『模擬』音箱,那麼我們得先來看一下,我們要去模擬什麼樣的音箱。

Amp Simulation, as the name suggests, is to "simulate" amplifiers, so we have to take a look at what kind of amps we want to simulate.

首先我們理解到我們要模擬的對象『Electric Guitar Amps』有很重要的特性,那就是帶有『失真』信號。即使是我們認為的Cleanish類別音箱,其實相較於Acoustic Guitar Amp 或者 PA系統,還是帶有失真特性。

First of all, we understand that the object we want to simulate, "Electric Guitar Amps", has a very important characteristic, that is, it has a "distortion" signal. Even what we think of as a cleanish category amp has distortion characteristics compared to an Acoustic Guitar Amp or PA system.

而我們所說的Electric Guitar Amp往往指的就是Tube Amp。 因為吉他手們喜愛真空管音箱那“溫暖且肥厚的音色”以及“充滿生命力的失真”。

And what we call Electric Guitar Amp often refers to Tube Amp. Because guitarists love the "warm, fat tone" and "organic distortion" of tube amps.


而電吉他音箱主要形成音色的部分在前端的PRE-AMP,這部分也是主要失真特性的來源。 所以在Digitech 、Zoom、Line 6這三個經典綜效老牌(2005~2010主力綜效品牌)在當時半導體行業發展下,採取了『Waveshaper』的建模方式。 這種建模方式的好處是,工程師不用理解真空管電路的工作原理。(小編為1983年生,在大學時期的Smith電子學聖經本早就沒有“真空管”了,當時電子行業也早已經是半導體為主流了。)

The main part of the electric guitar amplifier to form the tone is the PRE-AMP, which is also the source of the main distortion characteristics. Therefore, Digitech, Zoom, and Line 6, the three classic brands (main brands from 2005 to 2010), adopted the "Waveshaper" modeling method during the development of the semiconductor industry at that time. The advantage of this approach to modeling is that engineers don't have to understand how vacuum tube circuits work. (I was born in 1983. When I studied at university, the Smith Electronics textbook had no "vacuum tubes". At that time, the electronics industry was already dominated by semiconductors.)

這是Preamp的最後一級,旨在驅動效果環路,也是第一個出現失真的Preamp級。 該設計類似於 Mesa Boogie MK I 中的Preamp失真級。

陰極電阻器被完全旁路,以防止負反饋降低三極管電路的豐富非線性行為。 R1 和 R2 形成分壓器,以將大約 100V 峰值的最大板電壓擺幅降低到大約半伏峰值的最大影響發送擺幅。

根據 12AX7 計算器,柵極偏壓在非常溫暖的 -1V。

This is the final stage of a preamp designed to drive an effects loop and is the first preamp stage to break into distortion. The design is similar to the preamp distortion stage in the Mesa Boogie MK I.
The cathode resistor is fully bypassed to prevent negative feedback from reducing the triode circuit's lush nonlinear behavior. R1 and R2 form a voltage divider to reduce a maximum plate voltage swing of about 100V peak to a maximum effect send swing of about half a volt peak.
According to the 12AX7 Calculator, the grid is biased at a very warm -1V.

隨著輸入信號的增加,上游電阻網絡上的電網電流的影響會壓縮正向電網電壓擺幅。 輸入信號的負擺幅不受限制。 嚴重的不對稱性會產生大量的二次諧波失真,這種失真會提前達到穩定狀態並持續到負電網電壓擺幅達到大約 -3V。 此時,峰峰值板電壓擺幅幾乎達到極限。

當負柵極電壓擺幅超過-3.5V時,正極板電壓擺幅從溫和壓縮轉變為急劇削波。 輸出波形變得更加對稱,三次諧波失真開始占主導地位。 超過該點,輸出信號達到最大值 - 它無法響應輸入信號幅度的進一步增加。

As the input signal level increases, positive grid voltage swings are compressed by the effects of grid current on the upstream resistor network. Negative swings of the input signal run free. The severe asymmetry produces bucketloads of 2nd-harmonic distortion that plateaus early and lasts until negative grid voltage swings reach approximately -3V. At that point, the peak-to-peak plate voltage swing has almost reached its limits.

When negative grid voltage swings exceed -3.5V, positive plate voltage swings transition from mild compression to sharp clipping. The output waveform becomes more symmetrical and 3rd-harmonic distortion begins to dominate. Beyond that point the output signal is at its maximum - it cannot respond to further increases in input signal amplitude.


Traditional Waveshapers (Waveshaper Modeler)

傳統上,電吉他音箱的非線性行為是通過『Waveshaper』來建模的,它將輸出描述為輸入的函數。 例如,這是 Line 6 專利中包含的『波形整形器』(Waveshaper)。

Electric guitar amp nonlinear behavior has traditionally been modeled by a 『Waveshaper』, which describes the output as a function of the input. Here, for example, is a waveshaper included in a Line 6 patent.

對於線性電路,傳遞函數是一條直線。 Line 6 Waveshaper在正負輸入擺幅的極端情況下顯示壓縮。 它還描繪了不對稱失真,因為正電壓擺幅的曲線不是負擺幅曲線的鏡像。

For a linear circuit, the transfer function is a straight line. The Line 6 Waveshaper shows compression at the extremes of positive and negative input swings. It also depicts asymmetric distortion, because the curve for positive voltage swings is not the mirror image of the curve for negative swings.

聊到這裡,估計非工科的朋友已經暈倒了,所以我們就此打住,關於Waveshaper建模,後期有更多改進方法如“採用高通濾波器來捕捉耦合電容器 CG 的低頻行為“。
以及 “Cubic Spline Interpolation of the Transfer Function“、” A Digital High-Pass Filter to Emulate the Coupling Capacitor“ 等作法。

It is estimated that non-engineering friends have fainted, so let's stop here. Regarding Waveshaper modeling, there were more improvement methods in the later stage, such as " A high-pass filter that captures the low-frequency behavior of coupling capacitor CG".
And “Cubic Spline Interpolation of the Transfer Function“, ”A Digital High-Pass Filter to Emulate the Coupling Capacitor“, …etc.


The origin of Modeler

在2000年時,Line 6發表PDO,由於主打Amp Modeling的概念,從此綜合效果器就有了新的名詞定義~Modeler。

In 2000, Line 6 released PDO. Because of the concept of Amp Modeling, multi-effects has a new definition of the term ~Modeler.

Black Box & White Box 


2007年,Fractal Audio發表Axe-Fx,採用ADI的SHARC,運算力足夠實現『IR卷積』以及『白盒算法』。
2010年,Kemper發表Profiler,採用『黑盒算法』建模。(讓我們稱之為Profiling。)

In 2007, Fractal Audio released Axe-Fx, using ADI's SHARC, the computing power is enough to realize "IR convolution" and "white-box algorithm".
In 2010, Kemper released Profiler, which uses the "black-box algorithm" to do modeling. (Let's call it Profiling.)

Black-Box

https://en.wikipedia.org/wiki/Black-box_testing

黑盒算法建立的基礎在於系統自身信息不可知,而在只有輸入輸出關係的情況下獲得系統的傳遞特性的方法。
一般來說,工程師不需要程式代碼應用、內部結構和編程知識的具體知識。 測試人員知道軟體應該做什麼,但不知道它是如何做的。 例如,測試人員知道特定的輸入返回特定的、不變的輸出,但不知道軟體首先如何產生輸出。

Specific knowledge of the application's code, internal structure, and programming knowledge. In general, is not required. The tester is aware of what the software is supposed to do but is not aware of how it does it. For instance, the tester is aware that a particular input returns a certain, invariable output but is not aware of how the software produces the output in the first place.


黑盒算法是在對實體音箱或者效果器的內部結構未知的前提下,憑藉信號輸入/輸出的關係來猜測整個機器的工作狀態,當猜測的正確率達到一定程度時(例如高於98%)即認為實現這個音箱的音色。

黑盒算法的優勢是結構簡單,對運算力的要求不高,一般來說黑盒算法使用簡單的通用結構來實現音色的模擬。在相同的算力下黑盒算法通常可以獲得不錯的精度。他的主要缺點在於無法應對系統內部機構變化時的音色實時改變。例如,音箱和效果器都有音量,高中低音,增益等調節旋鈕,在黑盒算法建立模型的時候需要固定上述旋鈕於一個位置,然後測試信號的輸入輸出特性,求得模型的參數。一旦旋鈕的位置變化了,這個模型應對新系統的關係也就不成立了。所以這個方法適合作為一種拍照方法,把當前音箱的音色固定的採集下來使用。

The black-box algorithm is to guess the working status of the whole machine by virtue of the signal input/output relationship without knowing the internal structure of the physical amplifier or effector. When the correct rate of guessing reaches a certain level (for example, higher than 98%) That is to say, the sound of this amplifier is realized.

The advantage of the black-box algorithm is that it has a simple structure and does not require high computing power. Generally speaking, the black-box algorithm uses a simple general-purpose structure to realize the simulation of sound. Under the same computing power, black-box algorithms can usually obtain good accuracy. His main shortcoming is that it cannot cope with the real-time change of tone when the internal mechanism of the system changes. For example, amplifiers and effectors have adjustment knobs such as volume, high, mid, bass, gain, ...etc. When profiling a model with the black-box algorithm, the above knobs need to be fixed at one position, and then the input and output characteristics of the signal are tested to obtain the parameters of the model. Once the position of the knob is changed, the relationship of the model to the new system does not hold. Therefore, this method is suitable as a method of taking pictures, and the sound of the current amplifier is fixed to use.

White-Box


白盒算法就是打開一台設備的外殼,看裡面用了什麼元件,元件怎麼連接的,然後用一套數學方程來實現整個機器的工作狀態。

白盒測試的基本過程要求測試人員對被測試的源代碼有深入的了解。 程式員必須對應用程式有深入的了解,才能知道要創建什麼類型的測試用例,以便運用每一條可見的路徑進行測試。 一旦理解了源代碼,就可以對其進行分析以創建測試用例。

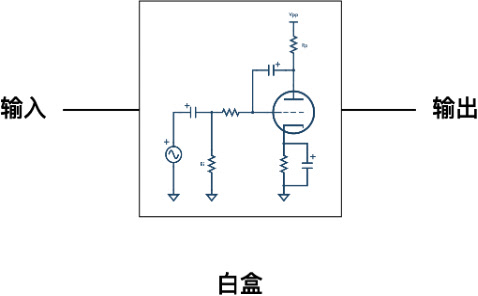
The white-box algorithm is to open the shell of a device to see what components are used inside and how the components are connected and then uses a set of mathematical equations to realize the working state of the entire machine.

White-box testing's basic procedures require the tester to have an in-depth knowledge of the source code being tested. The programmer must have a deep understanding of the application to know what kinds of test cases to create so that every visible path is exercised for testing. Once the source code is understood then it can be analyzed for test cases to be created.


在選擇建立虛擬設備時首先要確定使用什麼物理系統作為基本的條件約束,對於電子網絡來說僅需遵循牛頓定律,和克希霍夫電壓、電流定律即可:

When choosing to build a virtual device, you must first determine what physical system to use as the basic conditional constraint. For electronic networks, you only need to follow Newton's law and Kirchhoff's voltage and current laws:


上述定律可滿足一般阻容電路網絡的表述,如果需要引入磁場元件諸如變壓器,電感線圈等元件還可引入法拉第電磁定律:

The above laws can satisfy the expression of the general resistance-capacitance circuit network. If it is necessary to introduce magnetic field components such as transformers and inductance coils, Faraday’s electromagnetic law can also be introduced:

通過上面的四個定律可以描述任意複雜的電路拓撲,由於這這種對系統的表述方式不摻雜任何人為的影響,可獲取十分自然的信號響應,這正是白盒算法的魅力所在。
下面我們通過兩個例子來解釋如何實現上述系統求解,下圖是一個經典的話放EQ的中頻電路,電路包含電阻、電容、電感三種線性元器件:

Arbitrarily complex circuit topologies can be described through the above four laws. Since this way of expressing the system does not involve any artificial influence, a very natural signal response can be obtained, which is the charm of the white box algorithm.
Below we use two examples to explain how to solve the above system. The figure below is a classic circuit for mic preamp mid-EQ. The circuit includes three linear components: resistors, capacitors, and inductors:


我知道,到此已經很難再講下去了,我們直接說白盒算法的特點。

白盒算法的優勢是可以完全的反映模擬設備的所有特性,包括設備的調節旋鈕,電源,溫度等參數對音色的影響等。他還可實現和模擬設備相同的動態反映(樂手所說的手感)和高度逼真的音色。

他的主要缺點是:
1. 要為每一個類比元件建立單獨的數學模型,例如:電子管,晶體管,運算放大器,電阻,電容,電感,變壓器等元件,以及類比元件的電路是如何連接的,因此工作量十分巨大。
2. 需要設計者俱有非常深層次的類比電路設計理論知識才能重現原型機的音色。 
3. 需要大量的DSP算力來達到模型的高精確度。

I know it's hard to go on here, let's just talk about the characteristics of the white-box algorithm.

The advantage of the white-box algorithm is that it can completely reflect all the characteristics of the simulated equipment, including the adjustment knob of the equipment, the influence of parameters such as power supply and temperature on the sound, etc. It also achieves the same dynamic response (what players call playability) and highly realistic tone as simulated equipment. 

The main disadvantages are:
1. It is necessary to establish a separate mathematical model for each analog device, such as tubes, transistors, operational amplifiers, resistors, capacitors, inductors, transformers, and other components, as well as how the circuits of the analog devices are connected, so the workload is huge.
2. It is necessary for the designer to have a very deep theoretical knowledge of analog and electrical design in order to reproduce the sound of the prototype.
3. A large amount of DSP computing power is required to achieve high accuracy of the model.

上面的圖片就是NUX品牌採用『白盒算法』建模的程式網路結構。

The picture above is the program mesh structure modeled by the NUX brand using the "white-box algorithm".


The definition of Modeler & Profiler

由前面的介紹,我們可以了解Amp Modeler可分為 Modeler與Profiler。 這邊我們再補充一個新的做法,那就是『AI類神經網路』。

2020年,Neural DSP發表Quad Cortex,採用的就是AI算法,AI算法是基於『黑盒算法』的延伸,一樣無需知道系統內容,量測輸入、輸出信號的關係。 AI在於,不需要測試人員進行測試,而是自主測試,並且根據假設的系統方程進行訓練來獲得最逼近reference輸出結果的方程式。

From the previous introduction, we can understand that Amp Modeler can be divided into Modeler and Profiler. Here we add a new approach, which is "AI neural network".

In 2020, Neural DSP released Quad Cortex, which uses the AI algorithm. The AI algorithm is an extension based on the "black-box algorithm". It also does not need to know the system content to measure the relationship between input and output signals. AI lies in the fact that testers are not required to test, but are tested independently, and trained according to the assumed system equations to obtain the equations that are closest to the reference output results.

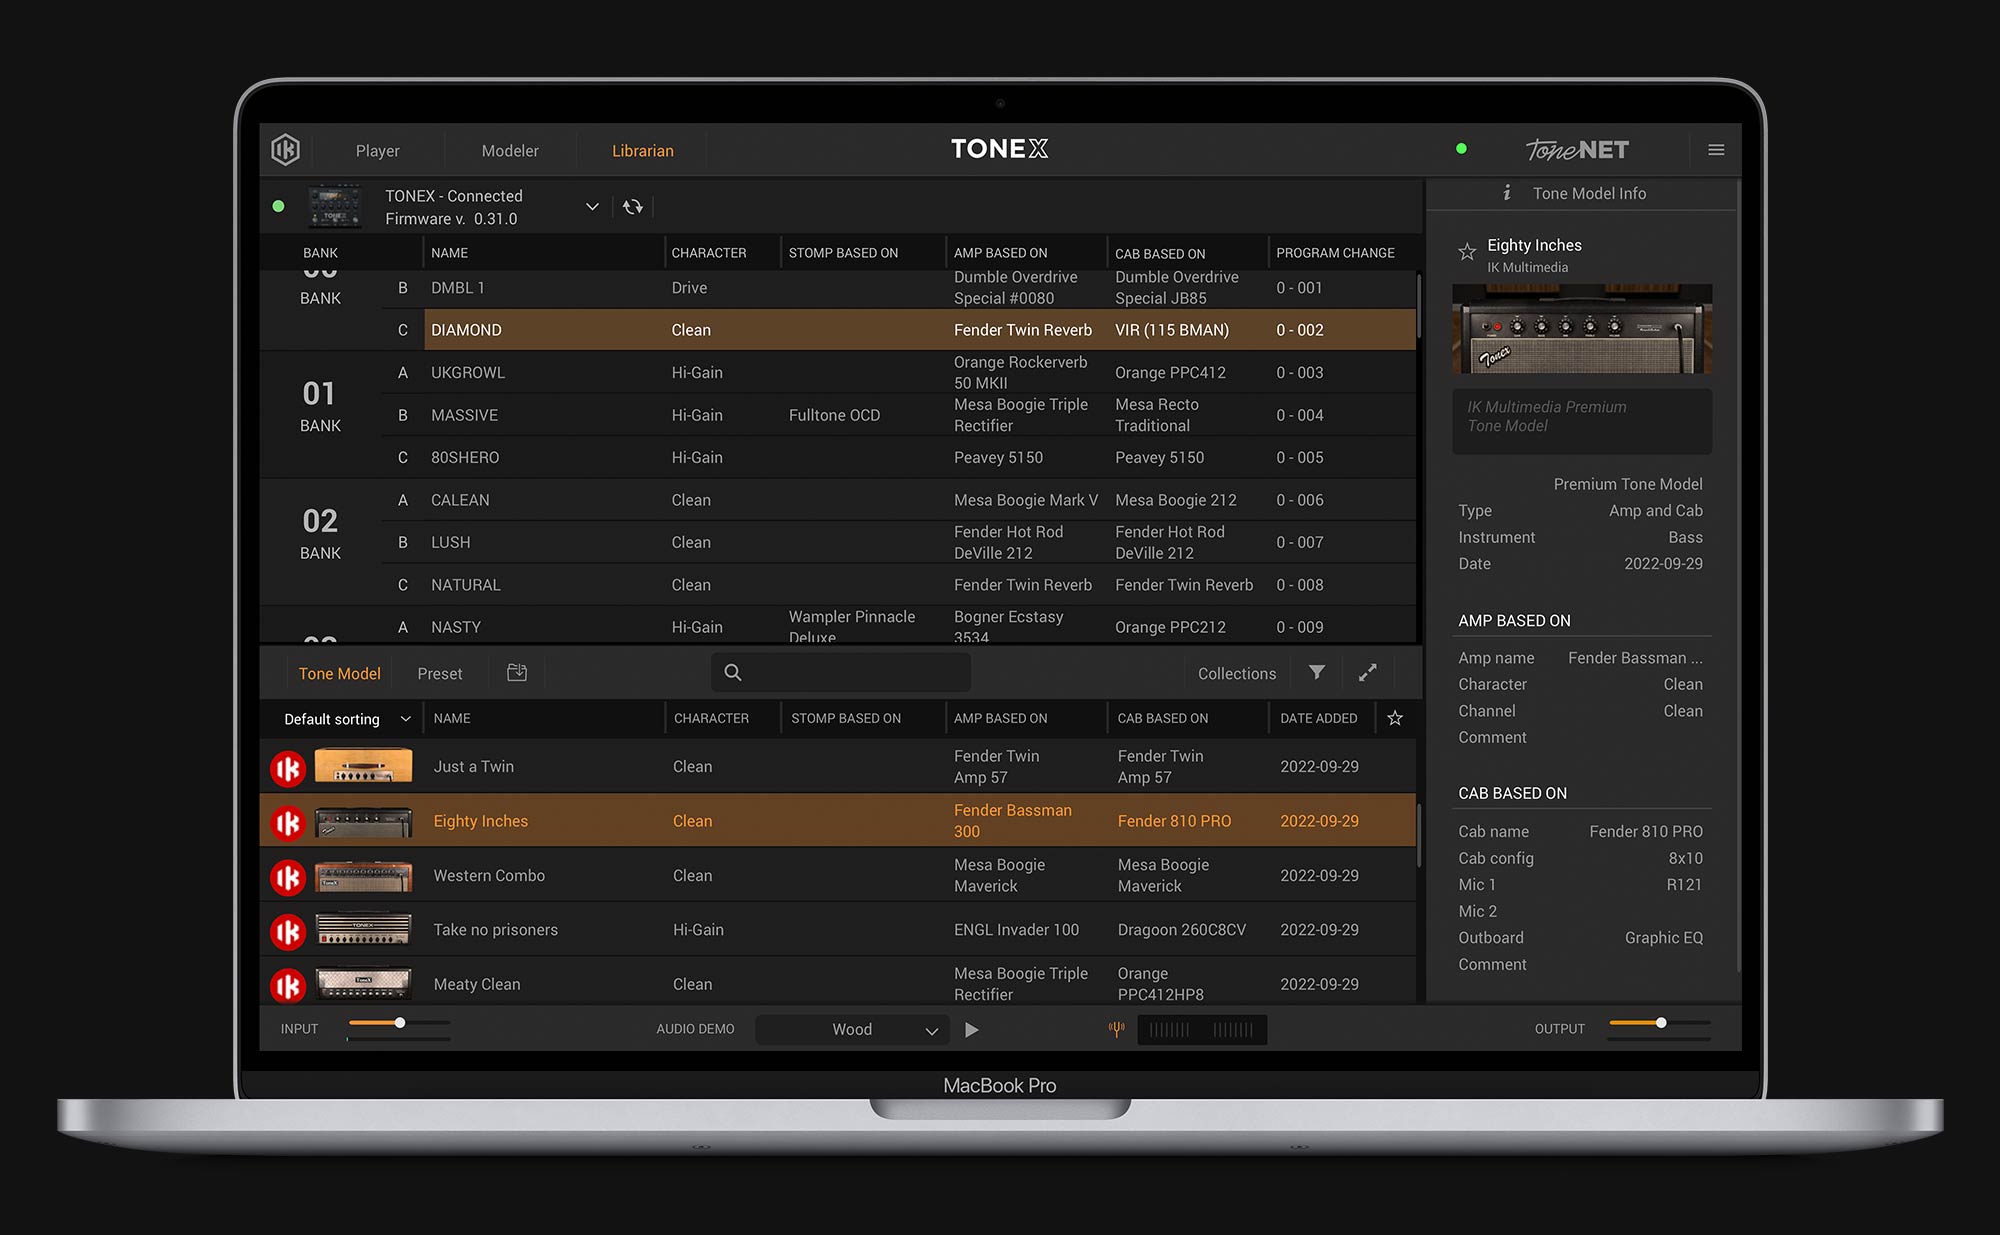
而最近IK所推出的TONE X也是基於AI。(IK稱為MACHINE MODELING。)

The TONE X recently launched by IK is also based on AI. (IK named it MACHINE MODELING.)

總結上述,Amp Modeler分為Modeler與Profiler,其中Modeler的技術又分成Waveshaper與White-box。 Profiler的技術分為Black-box與AI。

To sum up the above, Amp Modeler is divided into Modeler and Profiler, and the technology of the Modeler is divided into Waveshaper and White-box. Profiler technology is divided into Black-box and AI.


1. Waveshaper Modeler: 如LINE6、 ZOOM、 Strymon Iridium、 Walrus ACS-1、 BOSS IR-200, …etc.

採用Waveshaper的考量是,工程師不需要具備真空管電路數學模型的知識背景與工作原理,建立的Amp Model數學模型較簡單,不耗費DSP運算力。 
但缺點就是無法還原真空管音箱的負反饋與動態響應,進而影響手感。 最明顯的就是當你外接『過載效果器』時,聲音會被壓縮,縮掉。無法像真實音箱承受大信號。

The reason for using Waveshaper is that engineers do not need to have the knowledge background and working principle of the vacuum tube circuit mathematical model. The Amp Model mathematical model established is relatively simple and does not consume DSP computing power. 
But the disadvantage is that it cannot restore the negative feedback and dynamic response of vacuum tube amplifiers, which will affect the playability. The most obvious thing is that when you connect an "Overdrive pedal" externally, the sound will be compressed and shrunk. It cannot withstand large signals like real tube amplifiers.


2. White-box Modeler: 如Fractal、 NUX。

如前面所提到,白盒算法考驗著工程師要對系統(也就是真空管音箱電路)有高度的知識背景,且Programmer也要理解系統物理建模的數學模型。 再者每一層級的電路都需要進行量測校正,所以需要拆解原型機來做驗證,建模的過程相當耗時。
但對樂手來說,最重要的是White-box是可以最接近真空管音箱的『手感反饋』與『過載信號承受性』,以及轉動EQ旋鈕時的『混沌現象』。

As mentioned earlier, the white-box algorithm tests that the engineer must have a high degree of knowledge background on the system (that is, the tube amplifier circuit), and the Programmer must also understand the mathematical model of the physical modeling of the system. In addition, the circuits at each level need to be measured and corrected, so the reference needs to be disassembled for verification, and the modeling process is quite time-consuming.
But for musicians, the most important thing is that White-box is the closest to the "playability feedback" and "overdrive signal tolerance" of tube amplifiers, as well as the "chaos phenomenon" when turning the EQ knob.


3. Black-box Profiler: 如Kemper、 Mooer。

建模速度快,所以品牌方或者第三方,都可以進行Profiling,並且分享Profile檔案。(Amp Model) 但Profile缺點就是靜態參數,當你轉動EQ時,會跟reference有所差異,且你會發現雖然整體頻響跟原型機很像,但是彈奏手感都是定型的,即使你換了不同Amp Model。 當你外接過載效果器時,聲音也會產生不自然的壓縮。

The modeling process is fast, so the brand or the third party can perform Profiling and share the Profile file often. (Amp Model) 
But the disadvantage of Profile is the static parameters. When you turn the EQ, it will be different from the reference, and you will find that although the overall frequency response is similar to the reference, the playability is fixed, even if you change to different amp models. When you plug in an overdrive, the sound will be unnaturally compressed.


4. AI Profiler: 如Neural QC、 IK ToneX。

建模速度最快,其內建通用模型,AI自主訓練擬合曲線方程,Profile的過程較傳統黑盒子簡單。 整體頻率響應可以比傳統Profiler精準,但目前的AI Profiling時間還是相當長,如Neural QC約要40分鐘,一般用戶還是很少使用這個功能。 另外跟黑盒子算法一樣的缺點:彈奏手感都是定型的,即使你換了不同Amp Model。 當你外接過載效果器時,聲音也會產生不自然的壓縮。

The modeling speed is the fastest, its built-in general model, AI self-training fitting curve equation, and the process of Profile is simpler than a traditional black box. The overall frequency response can be more accurate than the traditional profiler. 
But the current AI profiling time is still quite long, for example, Neural QC takes about 40 minutes, and ordinary users still rarely use this function. 
In addition, the same disadvantage as the black box algorithm: the playability is fixed, even if you change to a different Amp Model. When you plug in an overdrive, the sound will also be unnaturally compressed.


Conclusion & My 2 cents

現代吉他手選擇Modeler的機會越來越高,因為演出時遇到Amp-less(無音箱)的場景越來越多。 喜歡單顆效果器組盤的吉他手會選擇Stomp-box Modeler類型來搭配自己喜愛的單顆效果器,尤其是『Overdrive』與『Distortion』。
 
The chances of modern guitarists choosing Modeler are getting higher and higher because there are more and more Amp-less (no speaker) scenes during performances. Guitarists who like effect pedals will choose the Stomp-box Modeler type to match their favorite effectors, especially "Overdrive" and "Distortion".

所以,如果你的考量是以live gigs為主,那麼挑選『白盒算法』為基底的NUX Amp Academy 將會是一個好選擇。 如前所述,『白盒算法』擁有近似真空管音箱的『Negative Feedback』、『良好的彈奏手感反饋』、『優異的動態範圍』、『過載效果信號承受性』。 
此外產品本身帶有可獨立切換IR開關的XLR輸出及1/4”(6.35mm)輸出,搭配OTG可以在現場使用手機進行深度調參,Send/Return外接post efx。 
但缺點是沒有傳統MIDI口或者3.5mm MIDI口,如果要使用MIDI踏板的話還需要使用帶有USB HOST的MIDI控制器。

If your consideration is based on live gigs, then choosing NUX Amp Academy based on the "White-box Algorithm" will be a good choice. As mentioned above, the "White-box Algorithm" has "Negative Feedback" similar to vacuum tube amplifiers, "good playability feedback", "excellent dynamic range", and "overdrive signal tolerance". 
In addition, the product itself has an XLR output and a 1/4” (6.35mm) output that can independently switch the IR on/off. With OTG, you can use your mobile phone for in-depth parameter adjustment. Send/Return is connected to an external post effector. 
But the disadvantage is that there is no traditional MIDI port or 3.5mm MIDI port, if you want to use MIDI pedals, you need to use a MIDI controller with USB HOST.


反之,如果你以家裡宅錄為主,希望有比較多的Amp Model,或者第三方做好的音色預設,那麼Profiler會是你的選擇。 畢竟宅錄,對於手感上的要求度會低一些,且錄進去後使用DAW外掛其他效果來修飾音軌是很常見的使用場景,就無須考慮『過載效果信號承受性』。且Profiler聽覺上更像『成音』的音色。(像是唱片裡錄製好的吉他音色。) 

而最近市場上討論度最高的平價Profiler,當屬IK ToneX。 小編的使用體驗上,覺得可惜的部分就是編輯預設的介面跟邏輯跟一般的綜合效果器差異很大。 機器本身只有LED屏,顯示的信息量少,現場調參不友善。 此外沒有Send/Return來外接post efx。 如果你要Capture其他reference的話,還需要另購ToneX Capture。

註記:如果你已經買了IK ToneX,對於編輯音色不太熟悉,可以參考這個教學影片。

If you mainly do home recording and hope to have more Amp Models or presets(patches) made by third parties, then Profiler will be your choice. Home recording has lower requirements on playability and it is a very common usage scenario to use DAW plug-in effects to modify the audio track after recording, so there is no need to consider the "overdrive signal tolerance". And the Profiler sounds more like a "processed sound". (Like the guitar sound recorded on a record.) 

The most discussed affordable Profiler on the market recently is IK ToneX. In the editor's experience, the regrettable part is that the interface and logic of editing presets are very different from those of general multi-efx devices. The machine itself only has an LED screen, which displays little information, and the parameter adjustment is not friendly. In addition, there is no Send/Return to external post-efx. If you want to capture other references, you need to purchase ToneX Capture separately.

Note: If you have bought IK ToneX and are not familiar with editing tones, you can refer to this tutorial video.


回顧一下,我所謂的『過載信號兼容性』

Recall, what I call "Overdrive Signal Compatibility".


IK ToneX vs NUX Amp Academy | Twin Reverb

IK ToneX vs NUX Amp Academy | Super Reverb


IK ToneX vs NUX Amp Academy | JCM800

Neural Quad Cortex vs NUX Amp Academy

NUX Amp Academy vs LINE6 HX STOMP | Fender Twin Rvb & Friedman BE-100

Strymon Iridium VS NUX Amp Academy | Drive Pedal Headroom & Response Test

相信聽完以上的對比後,大家應該更理解我所謂的『彈奏手感 Playability』、『動態範圍 Dynamic Range』、『過載信號兼容性 Overdrive Signal Compatibility』。

青菜蘿蔔各有所好,愛其所擇,擇其所愛~ 錢沒有不見,只是變成你喜歡的樣子!

I believe that after listening to the above comparison, you should understand what I call "Playability", "Dynamic Range", and "Overdrive Signal Compatibility".

Vegetables and radishes have their own preferences, love what you choose, choose what you love ~ the money is not gone, it just becomes what you like!

結尾附上小彩蛋~ IK TONEX與NUX AMP ACADEMY個別的耗電量:


Amp Academy Firmware V4

(2024/04/04 更新blog)
最近NUX又更新了Amp Academy,我相信大家最關注的不外乎有哪些新的Amp Model?
讓我們來瞧瞧~

1. Fender Deluxe Reverb (Deluxe Rvb搭配 IR "FDR112 BLU")


 2. VOX AC30 (Classic A30 搭配 IR “A30 212 BLEND”)


 3. Fender Princeton (Princetone搭配 IR “JEN P10R")


4. Mesa Boogie Lonestar (LSTAR 搭配 IR ”MES 212 V30”)


5. Marshall JCM2000 (Brit 2000 搭配 IR “M1960TV”)


6. Peavey 5150 (VIVO 搭配 IR ”PV412")

除了新的Amp Model以外,也釋出旋鈕鎖定功能,這個對於現場演出避免誤操作很實用!


Comparison with Kemper Profiler Player


這邊都是使用相同的第三方IR檔,錄音的方式都是採用USB RE-AMP。 盡量做到最小的差異性,音色也盡量調到接近。 不過兩者的Gain跟EQ屬性不太相同,不容易調到完全一至。 至於誰好誰好,就由看官們自行評論囉~

1. Mesa Boogie Dual Rectifier

2. Friedman HBE-OD

3. VOX AC30

4. Fender Deluxe Reverb

5. Marshall JCM800

點我了解更多➫


2021年10月3日 星期日

NUX MG-30調Tone指南完全解析

 NUX MG-30調Tone指南完全解析


對於綜合效果器怎麼調Tone眾說紛紜,小編在此以NUX MG-30這台效果器作為操作平台來分享自己的音色調整心得以及操作範例。

一、基本設定 (Basic Settings)

在開始介紹怎麼調整音色前,我們先來科普一些基本知識與概念。
從這張圖我們可以了解到我們所聽到的吉他音色,其實過程中包含:
吉他->拾音器->效果器->音箱->空間聲場->麥克風->混音器(錄音介面)=成音

而綜合效果器將其中的『效果器->音箱->空間聲場->麥克風->混音器(錄音介面)』這個過程給包辦了。
我們在播放『成音』音樂時,是透過『監聽喇叭』/『FRFR』音箱 / 『監聽耳機』來聆聽。
特別是現代的綜效(Modeler)大多帶有IR輸出,所以連接『監聽喇叭』/『FRFR』音箱 / 『監聽耳機』是最佳使用場景。 這邊我推薦使用『監聽喇叭』,因為聽覺上有一點距離跟空間感比較能還原我們的整體性。

1.輸出模式 | OUTPUT MODE 

在NUX MG-30機器上,你可以通過GLOBAL按鍵 -> OUTPUT MODE -> STUDIO DIRECT。
這個模式帶有IR信號,可用於連接FRFR音箱,監聽喇叭,監聽耳機等等。
我在這一個教學中,全程都是使用『監聽喇叭』來調整音色。

那我們來講解一下MG-30上的接口怎麼連接:

吉他接到INPUT接口。
AUX是用來接外部播放器(如MP3)。
耳機接口(3.5mm TRS)可用來推動耳機。
SEND連接到外接效果器的IN,RETURN則連接外接效果器的OUT。
立體聲6.35mm接口,L / R,我在這邊是將L OUT / R OUT分別接到混音器及監聽喇叭上。
EXP 1接口可接表情踏板,或者原廠附贈的NMP-2控制踏板,進行更多的音色切換控制。
TYPE-C USB口連接電腦: (1)Firmware韌體更新 (2)電腦端QuickTone編輯軟體調整音色/load IR (3)USB Audio Stream錄音介面功能。

2.認識『模型』(如『音箱模型』、效果器等)| Know the Models. (Amp Models, EFX) 

(1)Amp Models,首先我們來認識一下MG-30裡面的25個電吉他音箱模型:
認識這些音箱的原型後,感興趣的朋友可以自行google更多相關資訊。
這邊我們需要將這些音箱做一個『音色上的分類』,就讓我們依據F / V / M & Modern High Gain這四個概念來做分類。

Fender style (Cleanish): JAZZ CLEAN, DELUXE RVB, BASSMATE, TWIN RVB, VIBRO KING, SUPER RVB.

VOX style (Edge-of-Breakup): TWEEDY, HIGHWIRE, CALI CRUNCH, CLASS A15, CLASS A30, BUDDA, MR. Z38, BRIT BLUES, MATCH.

Marshall style (British-Crunch): PLEXI 100, PLEXI 45, BRIT 800, 1987 X 50, FIREMAN HBE, BRIT 2000.

Modern High Gain (Lead-Distortion): SLO100, DUAL RECT, DIE VH4, UBER.


有了上述音箱音色的分類概念後,對於調整音色就有相當的基礎了。


(2) 效果器 | EFX

動態類 Dynamic Categories: Compressor, Boost, Drive, Distortion, Fuzz, …etc.

周邊類 Modulation: Chorus, Phaser, Vibe, …etc. (How to use Sub-Division on MG-30?)

時間調變 Time-Based: Delay, Reverb.

Delay: Tape / Analog / Digital (Tip: Sub-Division) ; Reverb: Spring, Plate, Hall
這邊針對效果的部分,做一個初步分類,更多細節就留在後面說明。


二、創建自己的音色 | Create Your Own Patch 

1.從零開始創建音色:

(1) 選擇音箱類型: F Clean / V Drive / M Crunch / Distortion
(2) 添加『動態效果』(Dynamic Effects):視需求選擇『過載』或『失真』,並斟酌加入Noise Gate降噪。 
(3) 使用『時間調變』(Time-based)或『周邊效果』(Modulation)潤飾音色 
(4) 評估EQ來調整搭配伴奏

Tip: SCENE功能 或 使用NMP-2控制效果模塊開/關

下面讓我們用茄子蛋的浪流連這首歌來做一個『從零開始創建音色』示範。


2.內建音色參考 | Existing Patch Reference

(2.1) Vinai T , Jonathan Koh


(2.1.1) 從你喜歡的KOL著手,尋找他們的音色patch。
(2.1.2) 看下他們如何演示NUX MG-30,使用的是哪種吉他?

(2.2) Vinai T (VT Dist Lead) | Move The Sky


從上面的demo影片中,我們知道Vinai是使用HSH拾音器配置的Super Strat吉他來製作patch。
我使用Corona Modern Plus SE這款HSS拾音器配置的Super Strat吉他,在VT Dist Lead這個音色作調整。 這個patch使用的是Mesa Dual Rectifier音箱,IR為V412箱體採用C3000麥克風置中的位置。 由於Corona Modern Plus SE的Neck段拾音器是單線圈,所以Amp參數上的Gain跟Master都調大了些。


另外根據我自己的習慣,將GATE放到動態類效果之前,然後將EFX從TS改成Katana Boost。 相比TS,Katana作為Boost時,可以提供較多中高頻增益,有助於高把位彈奏的順暢度。(我也很喜歡使用MG-30裡的Rose Comp來增加高把位的增益與延音。)


VT Dist Lead modified patch下載


(2.3) Jonathan Koh(許華強) (JonK's Drive) | Paul Davis' Jam in C

Jonathan Koh簡介:https://www.facebook.com/groups/409979729057071/permalink/3676556052399406/

由於許華強老師是知名的流行樂演唱會樂手(也是有名的製作人與創作人),所以我選擇JonK's Drive這個音色作為流行曲的音色使用。
從上面的demo影片中可以看到Jon使用HH拾音器配置的Harley Benton Super Tele,這邊我使用同為雙雙拾音器配置的PRS Paul's Guitar。


JonK's Drive音色主要來自Brit 800 (Marshall JCM800)音箱模型的過載,前面使用Keeley Compressor來增加Gain以及Picking的平均度。


由於PRS Paul's Guitar拾音器出力相當飽滿,搭配這組音色很符合我自己的彈奏習慣,patch沒有做更動,只有加入Analog Delay去潤飾solo的音色。 Delay的調法就是依據曲子速度70BPM,設定Sub-Division為八分附點。
Tip: 在流行曲中,Delay設為八分附點可以凸顯出solo句子律動感,且依然維持在曲子的行進速度裡。 如此一來,相較於四分音符的Delay效果較為活潑,不易沈悶。 八分附點調法不需要將Mix Level及Repeat調大,就可以跳脫出來,音色也不容易糊掉。

(2.4) 裝載別人的音色 | Load Others’ Patches 

Export & Import Patches: 使用QuickTone編輯軟體,點擊右上角的導入導出Icon來進行Patch的導入與導出。 MG-30與MG-300使用QuickTone導入導出時Patch時,假設有使用第三方IR也會一起打包到Patch檔中,相當貼心。 這應該算是NUX品牌獨有的特色。

NUX MG-30有官方FB討論群,不介意英文交流的話,版上有許多熱心網友分享音色patch以及心得討論。
https://www.facebook.com/groups/nuxmg30group

當然MG-300也有官方FB討論群:

推薦: Direct Recording Guitar,他們製作了一系列的NUX MG-30音色分享示範。

熱心的他們也有製作MG-300音色分享示範。

他們還有專門的FB粉專提供給MG-30/MG-300用戶follow:


當然也不要忘記Jimmy Lin老師的YT頻道,聖智老師經常分享MG-30以及MG-300的音色,廣受海外網友們喜愛。


(2.4) 裝載第三方IR | Load 3rd Party IRs

對於Modeler來說,裝載第三方IR是有效提升音色的方法。


推薦的第三方IR網站:


上面這兩個網站都有販售很棒的IR檔,可以在網站試聽後再決定是否購買。
Choptones甚至還有販售NUX MG-30以及MG-300的patch檔,小編有試過幾套,音色製作相當用心!

對於IR(Impulse Response)還不太熟悉的朋友可以參閱以前的文章:


三、樂句循環錄音與鼓機 | Drum & Looper / 錄音介面 | USB Recording Interface

1. 樂句循環錄音與鼓機 | Drum & Looper

NORMAL RECORDING:

若MG-30放在地上腳踩踩釘使用,則推薦使用NORMAL RECORDING。
此模式在進入Drum & Looper後,選擇NORMAL RECORDING,按壓Loop踩釘就開始錄音。


AUTO RECORDING:

若MG-30放在桌面上使用時,則推薦使用AUTO RECORDING。
在進入Drum & Looper模式後,選擇AUTO RECORDING,此時按壓LOOP踩釘,機器進入準備錄音狀態,等到吉他彈奏輸入信號後自動錄音。 此後操作邏輯都跟一般Looper一樣。
在桌面上使用時,可以在QuickTone操作AUTO RECORDING,鍵盤上的『空白鍵』可以作為LOOP踩釘的熱鍵。 而Enter鍵為滑鼠點擊動作的熱鍵,所以你可以先用滑鼠點擊TAP後,改使用Enter鍵做TAP TEMPO。


2. 錄音介面 | USB Recording Interface

(2.1) 如何使用MG-30做為錄音介面? | How to use MG-30 as USB interface for recording?
讓我們來回顧一下之前的文章:

MG-30作為錄音介面的設定跟上面兩篇文章所說的步驟是一樣的,NUX產品中可以作為錄音介面的還有MIGHTY AIR、MIGHTY BASS 50BT、MLD Bass Preamp、OPTIMA AIR。
只能說NUX品牌太彿心了~


(2.2) Routing Mode密技 | What’s special for MG-30’s USB Routing Mode?


請參考之前的文章:

對於有在錄音的玩家,Re-Amp算是一個很便利的工具,MG-30在這方面的操作相當直覺友善。

四、創建你的三維音色 | Build Your Sound in 3 Dimensions 

關於空間,大家都能理解三個維度,但對於聲音的三個維度,這聽起來有點玄學。
就讓我們用最直觀的方式來講解如何實現聲音的三個維度,並且利用三維的聲音讓你的伴奏更好聽!
請使用監聽喇叭或監聽耳機聆聽以下影片:


在1 Dimension時,我沒有加入任何post effect。
在2 Dimensions時,首先加入Modulation(SCH-1 Chorus),讓聽覺上有左右聲道的些微晃動感。


然後再加入Delay(DUOTIME Stereo Delay),設置左聲道為四分音符,右聲道為八分附點的Sub-division。並將右聲道的REPEAT參數設得較多,讓他與左聲道的Delay結束的位置差不多。

在3 Dimensions時,除了上述的Chorus與Delay,我再加入SHIMMER,利用SHIMMER八度音的聽覺特性創造出聽覺上的垂直維度。

善用效果音色設置,可以讓你的彈奏簡單,聽覺華麗。

五、延遲效果 | Delay Category

Delay 延遲

延遲效果簡單來說是一種音頻信號處理技術,將輸入信號錄製儲存後間隔一個時段再播放。當處理過的音頻跟未處理的音頻混合在一起時,就產生了Echo(迴音)的效果。 先聽到原始音頻,然後是延遲的音頻。 延遲的信號可以播放多次,或者反饋到錄音裡來創建重複且帶衰減迴音的聲音。 延遲效果可朔源於1940s及1950s時的貓王Elvis Presley及Buddy Holly所使用的tape loops。 而類比延遲在1970s被發表,數位延遲效果則是在1980s發表,至於電腦端的軟體plug-in則是在2000s。
感興趣的朋友也可以先參閱JHS的Delay Pedals Explained。


60’s Tape Echo

1954年美國音樂製作人Sam Phillips發現使用Ampex 350磁帶錄音機做出Echo效果,於是大量使用在Elvis Presley及Buddy Holly的唱片中,並成為了Phillips的代表。


更多關於Tape Echo的故事,推薦大家去看JHS的Ultimate History of Tape Echo。


我們來講一個經典的機器,Roland Space Echo。 在60s末期,Kakehashi(Roland創始人)基於Echoplex創作了短磁帶迴圈的Tape Echo:Ace Tone EC-1 Echo Chamber,而在創立Roland後發表了RE-100、RE-200,之後更加入Spring Reverb發表了RE-201。


NUX MG-30的Tape Echo音色也是基於RE-201所建,不過可惜的是沒有完整的提供所有參數,如三個磁頭的組合以及高頻低頻的調節。 但還是有模擬出Tape Echo的音色精髓:1. Filtered Repeats , 2.Chorusing Effect , 3. Tape Saturation 以及扭動Time參數至最小跟Repeat參數至最大時所產生的Self-Feedback。


1. Filtered Repeats: 與數位延遲複製輸入信號不同的是,Tape Echo複製的信號會經由濾波器來進行降噪與此同時也產生動態的變化。
2. Chorusing Effect: Tape Echo含有許多物理移動的零件如馬達、滾軸、絞盤、主軸,而校準這些部件幾乎是不可能的,所以磁帶在運動中會產生細微的速度變化,使得重複的延遲信號產生輕微的音高顫動。 當這種輕微的顫音與乾信號混合併聯時,聽起來就像是微妙的Chorus效果,增加了音色的深度與複雜性。
3. Tape Saturation: 當錄製聲音到磁帶時,音量足夠大的話會超出磁帶的信號承受範圍。 聽起來就會有『過載』的現象,也是我們俗稱的“Tape Saturation”。聽覺上帶有失真以及溫暖的特色。

所以相較於BBD芯片的Analog Delay音色,Tape Echo的低頻衰減的多(低頻能量比高頻大,濾波器產生動態衰減時,低頻衰減的現象比高頻明顯。),而高頻又能夠聽出有點Pitch變調的Chorus效果。 後面我將舉例來說明我選擇Tape Echo與Analog Delay的應用。


70’s Analog Delay

在1970s,有個專有名詞誕生了“Bucket-Brigade Devices”,也就是俗稱的BBD芯片。 當時的電晶體延遲效果就是使用類比BBD芯片。 而在80年代時,有許許多多的效果器品牌都發表了Analog Delay,如EH、BOSS、IBANEZ等等。 而其中最著名的就是BOSS DM-2。

NUX MG-30則是採用了DM-2的下一代DM-3作為原型機模擬。

BBD芯片的Analog Delay音色以『溫暖』著稱,聽覺上相較於Tape Echo,複製的延遲信號在高頻衰減的相對明顯,有些人認為這聽起來比較自然。 也因為溫暖的音色,我自己喜歡用來做抒情歌的Solo音色使用。


80’s Digital Delay

數位延遲是透過A/D轉換後經由DSP錄製並儲存然後回放,錄製的信號稱為濕信號,原始信號稱為乾信號。將兩個信號混合後,再經由D/A轉換輸出。 在70s~80s時,DSP的單價還相當高昂,所以當時的數位延遲基本上都是以RACK式的專業器材為主,如Eventide DDL 1745、AMS DMX 15-80。 後來80s隨著記憶體的單價下降,數位延遲開始發展超過3秒的超長延遲時長,如Lexicon PCM42、Roland SDE-3000、TC Electronic 2290。 而2290後來甚至升級到32秒時長,可以做出Phrase Loop功能。 又因應積體電路發展微型化以及半導體單價急速下降,單顆形式的延遲效果器得以實現。第一個單顆數位延遲效果器於1984年因應而生~BOSS DD-2。 此時的RACK式延遲則開始整合Reverb效果,朝向更專業的POST-EFX發展。


NUX MG-30也基於BOSS DD系列建了DIGITAL DELAY。


基於三大類延遲音色的應用 | How do I use the Delay?

在之前的『創建你的三維音色』中,我使用了DUOTIME這個延遲模型來做出左右晃動的二維音色,在MG-30裡面的DUOTIME音色屬於Digital Delay,音色相當乾淨,所以用來作出清晰的音牆與氛圍相當合適。
那麼關於Tape Echo與Analog Delay,我又是如何考量的呢?
Tape Echo早期許多音樂用來做Slapback,所以彈奏一些Blues相當好聽。 我比較熟悉的曲風偏向搖滾與流行,在流行樂中,我會利用Tape Echo保有清晰高頻以及帶有些微Chorus的音色效果來做『堆疊』的樂句使用。 甚至你若有去鑽研早期EVH使用Tape Echo時會發現,那個年代會將Tape Echo放到音箱之前,此時將LEVEL與REPEAT轉到極小時,那短暫出現的延遲信號與帶有自然衰減的音色搭配音箱的失真可以提供相當具有Grooving的伴奏。 而這兩個應用,你會在下面的demo裡面聽到。
Analog Delay那高頻自然衰減但保有渾厚中低頻的音色,相當適合作為Solo音色使用。 除此之外,在伴奏的應用上,我會拿來潤飾分散和弦使用。就讓我們來聽聽下面的demo吧。


延遲時長應用 | Delay Time 

55ms Doubling (Thickening) Delay

在先前介紹Tape Echo的歷史時,相信已經有一些朋友對於Doubling Delay有概念了。 我們將時長設置在Tape Echo最短的55ms,或者Analog Delay最短的40ms。 由於Delay Time很短,主要是用來讓音色上有變肥厚的感覺。
讓我們用一段solo,來比較下有經過Doubling跟沒經過Doubling的差別。


120ms Slapback Delay

早期的Rock & Roll跟流行歌都很流行所謂的Slapback Delay,鄉村樂中也使用的很多。 而使用的技巧為將Tape Echo的Feedback(Repeat)調小至Single Repeat,這用來彈奏伴奏時相當常見。 若是應用在Solo時,則是將Mix(Level)調小,將Feedback(Repeat)調大。


Dotted Eight Delay

這邊我使用Digital Delay與Pan Delay搭配Tap Tempo與八分附點的Sub-Division,編了一小段Riff,來感受一下Dotted Eight這種具有Grooving的Delay用法吧。


335ms Analog Delay

選擇Analog Delay並將Repeat調至只有一次,將Level調小一些,聽得到Delay即可。 這樣的音色很適合用來彈奏Ballad類型的曲子。


900ms Long Digital Delay

這類型的長延遲效果,很適合用來彈奏浪漫的抒情歌。我使用的是DUOTIME這個立體聲的數位延遲效果,左聲道設置的是896ms(相當於1拍),右聲道設置的是673ms(相當於3/4拍);並將右聲道的Repeat參數調整的略多於左聲道(因為延遲時常較短,會比較早結束),這樣聽覺上左右的延遲會在接近的位置結束。


以上是關於綜合效果器調整音色的概念文章,有些觀點或許不太一樣,如果有錯誤的地方也歡迎留言指教。 如果喜歡這篇文章,歡迎轉發分享,YT頻道也歡迎點贊訂閱。 您的支持是小編寫作的動力~

Firmware V3 (2022/05/30)

官網釋出韌體V3了,請前往英文官網下載更新:https://www.nuxefx.com/mg30.html
溫馨提示:
在此之前,請將MG-30的patch檔導出,由於V3版本取消掉GHOST了,所以務必是使用patch導出來備份你的音色。
在韌體更新後請記得『恢復出廠設置』(FACTORY RESET)以及『表情踏板校正』(EXP Calibration),搭配最新版本的QuickTone™編輯軟體即可將舊的patch導入了。


讓我們來看看這次V3有什麼吧?

AMP Block: VIVO

基於EVH經典的Brown Sound原型PEAVEY 5150所建模的VIVO,命名方式確實很有新意!
根據官方說法,這個新音箱採用了TS/AC-4K白盒建模,帶有『後級輸出變壓器算法』,低頻的反饋極快,有別於其他高增益音箱模型的手感。
*官方聲明,算法團隊正在研究更多的TS/AC-4K白盒算法,但白盒建模極耗時間且也很耗費DSP運算力,所以需要做優化處理。但也預告著未來會有更多釋出,以MG-30的價位帶來說,MORE THAN EXPECTED! (感覺就是在說,不要催促咩~)


F Princeton

基於60年代Fender Princeton Reverb Blackface所建的模型,相當好聽的clean tone,是我很喜歡的一個model,相當適合作為pedal platform。


Slo100


雖然基於Soldano Solo100的Slo100之前就已經有了,但音色始終被網友們詬病容易clip。 所以這次NUX也基於TSAC-4K的Amp Modeling算法,將這個模型給修正了。 現在聽起來,中頻相當飽滿啊!


BRIT 2000


這款基於Marshall JCM2000 DSL的模型也是之前就有了,在網友們提出某些出力過大的琴在Gain鈕值很小時會出現奇怪的clip現象,於是乎NUX就索性更新為TSAC-4K算法,解決音色上的問題。 加入『輸出變壓器』算法後的TSAC-4K,很明顯的提升了低頻的飽滿程度,相當有肉。

EFX Block: RED FUZZ, TOUCH WAH


紅餅法茲! 對於Jimi Hendrix或者Eric Johnson音色感興趣的,多了一個好用的效果了。
Touch Wah的部分,有四種濾波器,CRY / VX / FULL / TALK,我個人很喜歡TALK這一檔,有點像機器人講話一樣。


DLY Block: Φ PHI DELAY

ΦPhi Delay 是具有二個抽頭且時長間隔具有黃金比例的數位延遲,能讓你的吉他聽起來更有音樂性。 簡單的操作,搭配Sub-Division,加上新釋出的Smart Tap Tempo,好聽好上手。


VOL Block: MIN, MAX Settings & Flexible Order within Patch


音量踏板模塊,可以任意調動位置,對於想要擺在空間系之前做Swell的用戶來說是一大福音啊!擺在失真前也可以用來控制增益。 參數還可以設置MIN/MAX值,讓音量控制可以更加靈活。 針對不同預設,可以當成效果模塊儲存,簡直不要太貼心。


EXP, EXP1, Footswitch Assignment


CTRL Assignment: 
        DLY -> S.Tap On/Off (Smart Tap Tempo)
        SCENE -> S3 ON/OFF
Tip/Ring: SCENE, RVB HF
EXP/EXP1: 針對EXP或EXP1 短按 旋鈕1 或 旋鈕2 -> Parameter MAX / MIN setup

CTRL踩釘新增了DLY模塊的Smart Tap Tempo(這是NUX的獨家專利,相當好用。)
CTRL踩釘在SCENE模式下可以將S3關閉,也就是說只在S1/S2間來回切換,對有些用戶來說比較不會誤操作?
Tip跟Ring踩釘(NMP-2)支持SCENE以及RVB HF控制。
表情踏板新增了參數最大最小值的設置,這樣用來控制如失真效果的Gain會更加靈活。

* EXP pedal behavior with FX - 表情踏板在觸發關閉後,該關聯效果的參數會回到觸發前。


Patch Rolling


旋轉MG-30上的五向鍵(搖桿)可以快速瀏覽patch,按壓可以直接進入,算是加快現場操作吧。

System Restore


為了避免“數據丟失意外”,V3版本提供了下位機(MG-30本體)進行GHOST BACKUP系統備份的設計。 萬一遇到數據錯亂或丟失的意外,你可以現場進行GHOST RESTORE將系統還原。

*V3版本的數據結構改動很大,所以這個版本以後的QuickTone™不再支持GHOST功能,老版本的系統備份無法導入了。 所以開頭請大家在更新V3前,記得先將patch導出。


IR Collection: 24 Slots


V3版本將IR COLLECTION整合到下位機(MG-30本體)了,這樣用戶可以直接在MG-30上,將自己常用的第三方IR放到USER SLOT使用。

USB Routing: Normal with Dry/Wet

V3新增了Dry/Wet的USB Routing設置,這就相當於可以把MG-30當成真正的錄音介面來使用。 將旋鈕打到Wet全開,並將MG-30所有效果關閉,此時你就可以使用PLUG-IN了。


相當彿心的NUX啊,上市不到一年,已經給了兩次大禮包了~


購買NUX MG-30