NUX MG-400 Tutorial | 完整教學

BEST VALUE MODELER|最具性價比綜效
繼NUX推出平價綜效MG-300以及台幣萬元級綜效MG-30後,現在推出瞄準末端售價7500台幣的MG-400。 那麼MG-400跟前面兩個機種在定位上有什麼差異呢?
1.採用跟MG-300一樣的AMP MODELING(TSAC-HD白盒算法)及IR。
也就是說,MG-400跟MG-300一樣簡單操作好調Tone。
註:小編發現,效果部分,內容相當於MG-30,特別是MOD, DLY, RVB;相當華麗的立體聲。
2.提供更靈活的Block Routing。
有別於MG-300只能將MOD調換到AMP之前,MG-400提供了相當自由的信號鏈順序調整。
不過應該是為了跟MG-30價位區隔,並沒有提供像MG-30一樣的post-efx並聯。

MG-400提供了CTRL1與CTRL2踩釘,這兩個踩釘可以通過CTRL按鍵來設置自定義功能,其中最有賣點的就是SCENE了。 MG-400跟MG-30一樣,一個PRESET下可以有3個SCENE(且如果用不到第三個場景,可以設置第三場景關閉。)
Scene功能,可以讓用戶自己定義,哪些效果模塊開啟,哪些效果模塊關閉。 相當於一鍵切換多種效果開啟與關閉,這對於現場演出相當方便。

簡介完後,我們進入教學的內容吧。
Tutorial | 操作教學
1. Firmware Update / QuickTone™ Editor Connection Issues / Hardware Inspection | 韌體更新 / 編輯軟體QuickTone™連接故障排除 / 下位機硬體檢測

Firmware Update

The most operation you will do is "Firmware Update".
(1) Connect the USB cable with PC & MG-400. Also, connect the ACD-006 adaptor with the MG-400.
(2) Press and Hold "DOWN" & "CTRL 1" footswitches, then boot up the device to enter DFU(Device Firmware Update) mode.
While the device enters DFU mode, you will see "Device Firmware Update" on the screen.
使用綜合效果器產品,最常操作的步驟就是『韌體更新』了。
(1) 將MG-400通過USB接口與電腦連接,並將ACD-006變壓器連接到MG-400。
(2) 按壓"DOWN"與“CTRL 1"踩釘,並按壓電源開關將MG-400開機。 如此便能進入『DFU』模式。
當下位機(MG-400)進入DFU模式時,機器屏幕上會顯示『Device Firmware Update』。
註記:為了描述方便,上位機代表電腦端編輯軟體QuickTone™,下位機代表機器本體MG-400。

(3) DFU Updater
Open the DFU updater on PC, if the MG-400 entered DFU mode, you can see it's connected with the DFU updater.
Then select the related bin file (firmware) to "Start Update".
Be patient to wait for the updating process. It may cost you 10~15 minutes.
While the firmware update is finished, the DFU updater will remind you, in the meantime, you will also see the hint on the device. Then remove the USB cable and reboot the device.
(3) DFU Updater 韌體更新軟體
在電腦端打開DFU Updater軟體(你可以從MG-400產品頁的Support下載相關的軟體以及韌體),如果MG-400有進入DFU模式,那在Updater即可看到MG-400已連接。
此時,點選Select File將下載下來的韌體點選(檔案格式為bin檔),並進行“Start Update"。
此時請耐心等待韌體更新過程,預計需要花費10~15分鐘。
當韌體更新完成時,DFU Updater會提示你,此時下位機螢幕也會提示更新完成。 這時候可以移除掉USB線,並將下位機重新開機。
QuickTone™ Editor Connection Issues | QuickTone™ 編輯軟體連線問題

當你的上位機 QuickTone™ 編輯軟體出現上面提示時(下位機韌體版本與上位機不匹配),就代表你需要更新下位機韌體了。(可以到產品頁面下載最新的韌體。)

當然,你也有可能遇到上位機 QuickTone™ 版本太舊,此時下位機屏幕會顯示上圖信息提示你到產品頁下載較新的 QuickTone™ 編輯軟體。

When you see the line graphic on the QuickTone™ editor and cannot enter the final interface, it means "USB Cable Issue", "USB Port Issue" or "USB HUB Issue".
Please make sure:
(1) The USB cable can do " DATA TRANSMISSION " instead of "Charging Only".
(2) USB port: QuickTone™ uses standard USB MIDI protocol, there is nothing special. So if you use a Lenovo laptop, and meet the connection issue. Please update the USB port driver.
If you use other WIN PCs and meet the connection issue, try to update "Windows Service Pack".
(3) USB HUB: Try to connect the USB cable to the "Root USB Port", do not connect to USB HUB.
How do WIN PCs detect the USB port and current USB connection status? Please try "USB View".
當你在上位機 QuickTone™ 顯示『線框圖』,無法進入最終的編輯界面時,代表你可能遇到以下狀況:『USB線問題』、『電腦USB接口問題』、『USB HUB問題』。
請確認:
(1) 所使用的USB線,可『傳輸數據』,而非『充電線』。
(2) 電腦上的USB口: QuickTone™ 採用標準的USB MIDI協議,並無特殊之處,若你遇到電腦端QuickTone™連不上MG-400出現『線框圖』時,確定使用的USB線材可與其他設備傳輸數據。 若你使用的是Lenovo(聯想)的筆記型電腦,請重新安裝並更新USB驅動。
若是其他WIN作業系統的筆記型電腦,除了到原廠下載並安裝USB驅動外,也可以試試『Windows Service Pack』。
(3) USB HUB: 請將USB接到電腦主機板上的根USB口(通常是離主機板最近的地方,桌機的話通常是主機背面)。 對於Win作業系統的電腦,要如何偵測USB口以及USB的連線狀態呢? 可以試一下 『USB View』這個軟體。
Tips:
If the MG-400's firmware is older and cannot adapt with QuickTone™ editor, you have to do firmware update. So after the update, don't be hurry to do FACTORY RESET & EXP CALIBRATION. Now you can connect QuickTone™ editor to export your existing patches. Then do the FACTORY RESET and EXP CALIBRATION. Import the patches into MG-400 with QuickTone™ editor.
技巧提示:
如果MG-400韌體版本較老無法適配QuickTone™編輯軟體,需要進行韌體更新。 在韌體更新後,不用著急做『恢復出廠設置(FACTORY RESET)』及『表情踏板校正(EXP CALIBRATION)』。 現在,你可以先連上QuickTone™編輯軟體,並將機器中的預設(patch)導出。 然後進行『恢復出廠設置(FACTORY RESET)』及『表情踏板校正(EXP CALIBRATION)』,再連上QuickTone™編輯軟體將預設導入到MG-400。
Hardware Inspection | 下位機硬體檢測

If you think your device may meet defective hardware issue, you can do " Hardware Inspection": Press & Hold " SELECT knob + left button + CRTL button + right button ", the device will enter Hardware Inspection mode, then you can tweak the knobs, press the buttons, press the footswitches, roll the EXP Pedal, then the DISPLAY will tell you the result.
Note: The MASTER knob is analog to control the overall volume, so it cannot be inspected in "Hardware Inspection".
若你覺得機器可能有硬體故障的可能性,可以先試試『硬體檢測』。
如上圖所示,按壓 “SELECT 旋鈕 + 左 按鍵 + CRTL 按鍵 + 右 按鍵“,下位機會進入『硬體檢測』模式,此時你可以轉動旋鈕、按壓按鍵、按壓踩釘、轉動表情踏板,下位機的螢幕會告訴你結果。
註記:由於MASTER旋鈕是“類比”的,控制下位機總輸出音量,他無法在硬體檢測中被檢測。
2. SYSTEM MENU | 系統菜單


Press the "EDIT/EXIT & SAVE" buttons to enter the SYSTEM MENU.
按壓下位機的 "EDIT/EXIT & SAVE" 按鍵進入 『SYSTEM MENU』(系統菜單)。
INFO:

在『INFO』下,你可以看到當前韌體版本。
EXP:

If you want to do EXP CALIBRATION, press CTRL 2 footswitch.
當你進入EXP選項時,第一個會看到的是『EXP IND.』,這代表你可以將表情踏板設置為獨立於Patch的設置。 舉個例子,當你在預設01A開啟表情踏板作為WAH時,然後切換到預設01B,這時候表情踏依然是處於『開啟』的狀態。
若你要進行『表情踏板校正』,請按壓 CTRL 2 踩釘。

Follow the guide, and you can do EXP CALIBRATION.
 You can set up the USB routing, Recording Level, and Playback Level here. Press the SELECT knob can RECALL the default setting.

 Parameter Follow means MG-400 can detect your parameter tweaking habits and remember them. While you use the effect model, the parameters will stay at the last time you leave.
依照下位機螢幕顯示,操作以上步驟即可完成『表情踏板校正』。
USB:

Of course, you can do the settings in the QuickTone™ editor.
在USB SETTINGS下,你可以設置USB音頻傳輸的 “錄音上傳音量(Recording Level)”、“系統播放音量(Playback Level)”、“USB錄音路徑(USB routing)“。 按壓SELECT旋鈕可以呼叫“默認預設值”。
當然,這些設置也可以在QuickTone™ 上位機中完成。
IN TRIM:

Cause different guitars have different output signals. If you use another guitar and don't want to modify the current presets you have already done, you can tweak the INPUT TRIM to adapt to the existing presets.
由於不同吉他有不同的輸出信號(出力),若你使用另一把吉他,可是不想去更動已經做好的當前預設參數值,那麼你可以利用INPUT TRIM調整來適配這些已經做好的預設。
PARA:
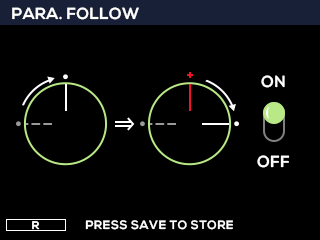
參數跟隨(Parameter Follow)意味著MG-400可以偵測你的參數調整習慣並且記錄他們。 當你開啟效果時,參數會停留在你上一次退出的狀態。
FACTORY:

You can do FACTORY RESET here.
Note: GHOST BACKUP can save all the system data including patches, and global settings. If you have a data error accident, you can restore the GHOST.
在此,你可以進行『恢復出廠設置』。
註記: GHOST BACKUP 可以備份系統數據,包含了預設,全局設定等參數。 如果你遇到系統數據錯誤的意外,可以進行GHOST RESTORE,將整個系統數據還原回來。
3. Tone Tweaking | 音色調整


Before we start to talk "TONE TWEAKING", remember to set MG-400's MODE as STUDIO DIRECT. Then connect your monitors to MG-400.
在我們探討『音色調整』前,記得將MG-400輸出模式設置為STUDIO DIRECT。 並將監聽喇叭接到MG-400。

For the modelers, in the 1st step for "TONE TWEAKING":
Please bypass all the effect blocks, and set the dry signal volume as you want. (Tweak the MASTER knob from minimum to the desired comfortable volume so that you feel it loud enough and it won't hurt your ears.)
Then start to add the blocks like AMP, IR, dynamic effect, ...etc.
關於綜合效果器(Modeler),調整音色的第一步:
請bypass所有的效果模塊,設定乾信號的音量達到你想要的程度。 (將MASTER旋鈕從最小刻度開始調整到你覺得音量足夠大且不會傷害你的耳朵、舒服為準。)
然後才開始加入效果模塊,如AMP、IR、動態效果(Compressor、Pre-efx)及其他效果...等等。
(1)Amp Categories: Cleanish / Edge-of-Breakup / British-Crunch / Lead-Distortion | 音箱分類: 清音 / 過載邊緣 / 英式過載 / 失真
The first block I will add is AMP (add the related “CAB / IR” at the same time), so in the beginning, I have to decide the Amp Category I want for the patch.
Let's classify the amps as Cleanish (Fender Clean), Edge-of-Breakup (Vox Drive), British-Crunch (Marshall Crunch), and Lead-Distortion (Modern Distortion).
We can simply call them F / V / M / Modern Dist.
我第一個會添加的效果模塊是AMP(與此同時,我會加入對應的“箱體 IR”),所以一開始我必須決定在這個patch中,我想要的音箱類別。
讓我們來對音箱做個分類吧: 清音 (Fender Clean), 過載邊緣 (Vox Drive), 英式過載 (Marshall Crunch), 失真 (Modern Distortion)。
簡稱為 F / V / M / Modern Dist。

In the MG-400, the cleanish amps are Roland JC-120, Fender Deluxe Reverb, Fender Twin Reverb, Fender Vibro King, and Fender Super Reverb.
My favorite clean amp in MG-400 is SUPER RVB.
在MG-400裡面,清音類型的音箱有 Roland JC-120,Fender Deluxe Reverb,Fender Twin Reverb,Fender Vibro King,以及Fender Super Reverb。
我在喜歡的清音音箱模型為SUPER RVB。

The Edge-of-Breakup amps are VOX AC15, VOX AC30, Fender Bassman, Fender Tweed Deluxe, HIWATT DR103, Mesa Boogie Mark I, BUDDA SUPER DRIVE, Dr. Z MAZ 38, Marshall Bluesbreaker, and Matchless DC30.
過載邊緣的音箱有: VOX AC15, VOX AC30, Fender Bassman, Fender Tweed Deluxe, HIWATT DR103, Mesa Boogie Mark I, BUDDA SUPER DRIVE, Dr. Z MAZ 38, Marshall Bluesbreaker,以及 Matchless DC30。

The British-Crunch amps are Marshall Super 1959, Marshall JTM45, Marshall JCM 800, Marshall 1987X, and Marshall JCM 2000.
英式過載音箱有: Marshall Super 1959, Marshall JTM45, Marshall JCM 800, Marshall 1987X,以及 Marshall JCM 2000。

The Lead-Distortion amps are Soldano SLO100, Friedman BE100, Mesa Boogie Dual Rectifier, Diezel VH4, and Bogner Uber.
失真音箱有:Soldano SLO100, Friedman BE100, Mesa Boogie Dual Rectifier, Diezel VH4,以及 Bogner Uber。
*All of the brand and model names mentioned on this page are Trademarks of their respective owners, which are in no way associated or affiliated with NUX Effects and Cherub Technology CO. LTD.
After I chose the amp model, what I will do:
Set the EQ flat, then adjust the GAIN and LEVEL as balanced as the flat dry signal.
Dig the EQ according to BASS, MID, TREBLE, and PRESENCE.
While I dig the bass, I will play the 5th & 6th open strings and tweak the BASS knob from minimum to the BASS critical point. In the meantime, you will hear the BASS frequency volume increase quickly.
Same as the MID, I will play the 3rd & 4th open strings and tweak the MID knob from minimum to the MIDDLE critical point. In the meantime, you will hear the MIDDLE frequency volume increase quickly.
Same as the TREBLE, I will play the 1st & 2nd open strings and tweak the TREBLE knob from minimum to the TREBLE critical point. In the meantime, you will hear the TREBLE frequency volume increase quickly.
Same as the PRESENCE, I will play the 1st & 2nd open strings and tweak the PRESENCE knob from minimum to the PRESENCE critical point. In the meantime, you will hear the PRESENCE volume increase quickly.
*NOTE: The VOX-style amp uses a CUT knob, I will tweak it counterclockwise.
Then I will adjust the GAIN and LEVEL again, and find the sweet spot for the AMP model.
In the last step, choose the CAB IR's microphone style and position.
在選定音箱模型後,我會執行以下動作:
將音箱模型的EQ調平,再將音箱模型的 GAIN 與 LEVEL 調平與 乾信號音量相當。
進行EQ的細調節,依序調節BASS(低頻), MID(中頻), TREBLE(高頻), PRESENCE(臨場度,也可稱為超高頻)。
調節低頻時,我會彈奏第五弦及第六弦空弦音,並將BASS旋鈕從最小值開始轉大直到低頻臨界點。 與此同時,你會聽到低頻忽然衝出來,這就是臨界點。
同樣的方式調節中頻。 調節中頻時,我會彈奏第三弦及第四弦空弦音,並將MID旋鈕從最小值開始轉大直到中頻臨界點。 與此同時,你會聽到中頻忽然衝出來。
同樣的方式調節高頻。 調節高頻時,我會彈奏第一弦及第二弦空弦音,並將TREBLE旋鈕從最小值開始轉大直到高頻臨界點。 與此同時,你會聽到高頻忽然衝出來。
同樣的方式調節臨場度。 調節臨場度時,我會彈奏第一弦及第二弦空弦音,並將PRESENCE旋鈕從最小值開始轉大直到臨場度臨界點。 與此同時,你會聽到臨場度超高頻忽然衝出來。
*註記:VOX類型的音箱模型使用的是CUT旋鈕,我會逆時針方向調節他。
然後我會再次調節GAIN與LEVEL,尋找出音箱模型的甜蜜點。
最後一步則是選擇箱體IR的麥克風類型與位置。
(2)Dynamic effects: Pre-efx, Cmp (Gate in case.) | 動態效果: 前級過載、壓縮 (必要時加入『降噪』)

Depending on the need, I will add a compressor for the cleanish amp, an overdrive pedal for the Edge-of-Breakup amp even the British-Crunch amp. Sometimes you can add a compressor for the Lead-Distortion amp to enhance the gain of high position notes.
If there is too much gain with noise, add "Noise Gate" just in case.
依據需求,我會在『清音音箱模型』加入Compressor(壓縮)效果;在『過載邊緣音箱』或『英式過載音箱』加入Overdrive(過載)效果。 有時候在『失真音箱』加入Compressor(壓縮)可以增加高把位音符的增益。
如果增益太多伴隨著噪聲,那麼適當加入Noise Gate(降噪)。
(3)Time-based or Modulation | 時間系或調變效果

Here I listed the MOD models I use mostly. For the Chorus, I usually add it to a cleanish amp model and play the arpeggios for pop accompaniment. For Phaser and Tremolo, I would like to put it before the British-Crunch amp to make it sound fatter or stereo-like.
這裡我列舉了我常用的MOD模型。 以Chorus來說,我經常加入到『清音音箱』來彈奏流行曲的分解和弦伴奏。 至於Phaser或Tremolo,我喜歡放到『英式過載音箱』之前,讓他聽起來更肥或者更有立體感。

延遲效果|Delay Category
延遲時長應用 | Delay Time
Usually, I add the delay for the solo part. If I want the sound has more room or space, I will add reverb to it. Same as Reverb, it's also an advanced skill to use the reverbs related to the sound characteristics and decay time. I won't talk about it here, if you are interested in this topic, please visit my previous post:
創建你的三維音色 | Build Your Sound in 3 Dimensions
Delay(延遲)效果,有好幾種類型,針對延遲的音色與時長來使用是一種進階的技巧,這裡我不會去談論。 如果你對這個話題感興趣的話,請參考我之前的文章:
延遲效果|Delay Category
延遲時長應用 | Delay Time
通常我會在solo的部分加入Delay(延遲)效果。 如果我想要聲音更有空間感,我會加入Reverb(混響)。 而對於Reverb(混響)效果來說也是一樣的,針對混響的音色與decay(衰減)來使用是一種進階的技巧,這裡我不會去談論。 如果你對這個話題感興趣的話,請參考我之前的文章:
創建你的三維音色 | Build Your Sound in 3 Dimensions

For the solo part, my favorite delay sub-division setting is DOTTED EIGHT (3/4). It makes your solo more melodic and musical.
 It's almost the last step of TONE TWEAKING. Basically, I don't like to use EQ to shape my patch. While I dig the sound, Amp Model & IR already determine the fundamentals, the Boost will shape the tone a little bit, and it still keeps the natural sound and playability.


 Under JAM page2:
這編我想提一個“延遲效果”的技巧,Sub-Division。 你可以在延遲效果模塊中的『SUB D.』選擇想要的『拍號』,然後指定 CTRL 踩釘來做『TAP TEMPO』。 與此同時,延遲效果的TIME參數會依據TAP TEMPO的速度(BPM)以及SUB-DIVISION。 若你轉動TIME旋鈕(參數),此時延遲效果的TIME參數就會依據TIME旋鈕。
在曲子的Solo部分,我最愛的延遲效果Sub-Division設定為 ”DOTTED EIGHT 八分附點“ (3/4拍)。 這使你的Solo聽起來更有旋律性及音樂性。
(4) EQ & Volume | 均衡 & 音量

EQ can shape the sound a lot, sometime it will affect your playability, that's the reason I usually don't use it.
But while I play the patch with a song, and I find the sound is not as " front " as the song need, I will use EQ to shape it.
到此我們幾近到達『音色調整』的最後一步了。 基本上我並不喜歡使用EQ來修整音色。 當我調Tone時,音箱模型與IR已經底定基礎了,Boost(推子)會修飾一點音色,但他仍保持自然的音色與手感。 EQ可以改變音色許多,有時會影響你的手感,這就是我不愛用的原因。
但是當我彈奏一首歌時,若我發現這個音色預設在曲子裡不夠“靠前”,我就會使用EQ來修飾他。

This is the 10 Band EQ setting I usually use to shape my sound.
這是我經常用來修飾音色的10段EQ參數設置。
The final step: Re-Level the patches.
In the MG-400, you can adjust the overall patch volume through P.L (Patch Level) block. Actually, I don't use it, if you follow the TONE TWEAKING steps correctly, you won't need it. For me, it's just in case. But I use P.L to set my Volume pedal order, I usually put it after AMP & IR, before MOD, DLY, and RVB. This can make the sound keep trails while I decrease the volume.
最後一步: 調平patch的音量。
MG-400提供了P.L(Patch Level)模塊,你可以通過他來調整patch的整體音量。
事實上我不會去用他,如果你正確地依照『調整音色』步驟,那你將用不到他。
對我來說,他是備而不用。 但我會使用P.L模塊來設置音量踏板的位置順序,我經常將它放在AMP & IR之後,MOD/DLY/RVB之前。 當我衰減音量的時候,可使音色保持尾音。
4. CTRL Footswitch Tip | CTRL踩釘技巧


Under PRESET mode, press the CTRL button to enter CTRL SETTING, as you can see on the display, the CTRL settings can be saved into the patch.
You can assign the CTRL footswitch to do TAP or engage/disengage CMP/NG/EFX/EQ/MOD/DLY/RVB block or SCN. I mostly assign CTRL 1 as TAP to tap tempo the delay time, and assign CTRL 2 as SCENE.
在PRESET(預設)模式下,按壓CTRL按鍵進入CTRL SETTING,如屏幕所示,CTRL設定可以儲存在patch裡面。
你可以指定CTRL踩釘作 TAP 或者 開啟/關閉 CMP/NG/EFX/EQ/MOD/DLY/RVB 模塊,又或者作為SCN控制。 我最常指定CTRL 1作為TAP來『拍點定速』延遲效果的時長,指定CTRL 2作為『SCENE』(場景)使用。

For the SCENE, you can sequentially go from S1 to S2 to S3, and back to S1. (SCN3: ON) Or you can sequentially go from S1 to S2 and back to S1. (SCN3: OFF)
SCENE means you can engage/disengage a couple of blocks at the same time.
場景功能,你可以依序從S1->S2->S3再回到S1。(SCN3: ON)
或者,依序S1->S2再回到S1。(SCN3: OFF)
SCENE(場景)意味著你一次可以 開啟/關閉 多個效果模塊。
5. JAM (Drum & Loop) | 即興 (鼓機 & 樂句循環)

Press JAM button to enter DRUM & LOOP. Press CTRL/PAGE button can go to JAM page2.
按壓JAM按鍵進入DRUM & LOOP。 此時按壓CTRL/PAGE按鍵,可進入到JAM頁面2。

Under JAM page1, you can rotate SELECT knob to choose the desired rhythm. (RIGHT & LEFT buttons can select the rhythm style.)
KNOB 1 controls DRUM VOLUME, KNOB 2 controls LOOP VOLUME, and KNOB 3 controls BPM. You can also use TAP button (Tap Tempo) to control BPM.
在JAM頁面1下,轉動SELECT旋鈕選擇想要的節奏型。(右向鍵&左向鍵可框選節奏型態。)
旋鈕1控制DRUM VOLUME,旋鈕2控制LOOP VOLUME,旋鈕3控制BPM。 你也可以按壓TAP按鍵(Tap Tempo)來定速。

Press SELECT knob to switch STEREO/MONO or NR/AR.
Rotate SELECT knob to select STEREO/MONO or NR/AR.
KNOB 1/2/3 are related to DRUM EQ.
Note: NR=Normal Recording as a regular loop. AR=Auto Recording, which means while you press REC, it's ready to record until you play the guitar signal to start.
Press JAM button to quit.
在JAM 頁面2下:
按壓SELECT旋鈕,切換STEREO/MONO 或 NR/AR。
轉動SELECT旋鈕,框選STEREO/MONO 或 NR/AR。
旋鈕 1/2/3 控制 DRUM EQ。
註記:NR=Normal Recording 跟一般的Loop操作邏輯一樣。 AR=Auto Recording,當你按下REC時,隨時準備錄音,等你彈奏吉他信號進去後就開始錄音。
按壓JAM按鍵,即可退出。
6. Recording | 錄音

I use MAC, so I will demo the recording tutorial with Logic Pro.
Follow the connection, and remember to set MG-400's OUTPUT MODE as STUDIO DIRECT.
MG-400支持USB audio stream,你可以將它作為錄音介面。 如果你是WIN OS用戶,請到產品頁面下載相關的ASIO驅動。
我使用的是MAC電腦,所以我會使用Logic Pro來做錄音教學示範。
依照上圖將設備連接,記得將MG-400的輸出模式設為STUDIO DIRECT。

Go to System Preferences to set up the Sound. Choose NUX MG-400 as Input & Output.
到『系統偏好設定』去設置『聲音』。 將NUX MG-400設為『輸入』及『輸出』裝置。

開啟DAW(這裡示範的是Logic Pro),並到Preferences設定Audio的 I/O Buffer Size為 128 Samples。

In order to let the song sounds more stereo, I add the Rythm Left and Ryrhm Right.
Of course, the bass track is needed. MG-400 offers MLD bass amp model, you can hear the bass track.
Till now, I almost finished a simple song, then let's play the solo part!
讓我們開始錄製一首簡單的曲子吧。 如圖所示,我彈奏了『Cleanish Arpeggio』作為主要的伴奏。 然後我創建了『Drummer Track』來跟隨這個伴奏。
為了讓曲子聽起來更立體感,我加入了『Rythm Left』及『Ryrhm Right』。
當然,貝斯軌是必須的。 MG-400提供了MLD這款貝斯音箱模型,你可以聽到曲子裡的貝斯軌。
目前為止,我幾乎完成一首簡單的曲子了,讓我們來彈奏主奏的部分吧!

For the solo part, I used Dry Out and Reamp.
While you setup Dry Out, what you heared is processed signal, but what you recorded onto DAW is dry signal.
Solo的部分,我使用了Dry Out跟Reamp技巧。
當你設定Dry Out時,你聽到的是處理過(帶有效果)的信號,但你錄上去DAW的是乾信號。

After you recorded the dry signal track, then create a new track for Reamp. While you want to record the Reamp track, remember to mute all the other tracks and only play the dry signal track to record the Reamp signal.
在錄完乾信號音軌後,創建一個新的Reamp音軌。 當你要錄製Reamp音軌時,記得將其他軌都靜音,只播放乾信號音軌來錄製Reamp信號。

You can join to the MG-400 discussion group for more informations and patch sharings.
Thank you for watching!
你可以加入MG-400的討論群獲得更多資訊及音色分享。
感蝦支持!